PayPal
 Stripe
 QuickBooks
 Zoom
Zoom Google Meet
 Zapier
 Mailchimp
How to Add New API Integrations
Project management and adding API integrations play a crucial role in enhancing workflow efficiency and automation within a project management system. By integrating APIs, businesses can connect their project management software with other essential tools such as accounting systems, communication platforms, and customer relationship management (CRM) solutions. This seamless connectivity allows for real-time data synchronization, reducing manual input and the risk of errors while improving overall productivity. Project managers can easily track project progress, manage resources, and ensure smooth collaboration by leveraging automated workflows and data sharing across multiple platforms. Adding API integrations also provides scalability, enabling organizations to customize their project management processes according to their evolving needs. Ultimately, integrating APIs helps businesses achieve greater efficiency, improved decision-making, and enhanced project outcomes.
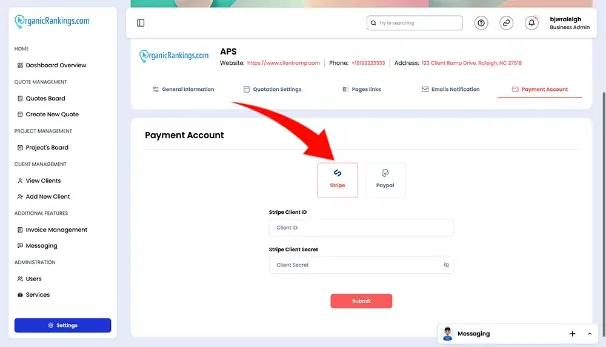
Stripe Client ID and Secret Key Support
To obtain your Publishable Key and Secret Key from Stripe, you need to have a Stripe account (www.stripe.com).
Go to www.stripe.com and click "Sign In".
After logging in, your Stripe dashboard will open. From the left-hand menu, click "Developers" and then "API keys".
On the "API keys" page, you'll find the Publishable Key under Standard Keys. To view the Secret Key, click the button labeled "Reveal live key token" above the Secret Key field.
Sandbox and Live Modes
To toggle between Sandbox (Test Payments) and Live (Real Payments) modes, click "View test data" in the left-hand menu. Remember, Sandbox and Live modes use different keys.
Understanding PayPal Client ID and Secret Key
To proceed, ensure that your PayPal email address is confirmed. Additionally, you must have a verified PayPal Business account before generating live API credentials. Follow these steps to obtain your Client ID and Secret Key:
Log In: Access the PayPal Developer Portal using your live PayPal credentials.
Navigate to Apps & Credentials: From the top menu, click Apps & Credentials. Choose either Live (for production) or Sandbox (for testing), depending on your requirements.
Create a New App:
Click Create App in the top-right corner.
Provide a name for your REST API app in the App Name field.
Select the application type (Merchant or Platform).
Associate your app with a Sandbox business account (if applicable).
View Your API Credentials: After clicking Create App, your Client ID and Secret Key will be displayed on the app details page.

Integrating QuickBooks API
Create an account in the Intuit Developer portal.
Create an app under your developer account.
Find your client ID and client secret under the Keys & OAuth tab of your app.